
 Today morning I was a little bit scared when I saw the traffic stats of one of my affiliated blogs.There was no traffic when I saw in the morning.The reason is that the blog has been flagged as "This site may harm your Computer". in the Google search results.
What is wrong with that blog I really don't know.I made a detailed study of the issue and finally got the issue resolved within 6 hours.It was really a threatening scene for me as I saw this message in the Google Search.Then I went to Safebrowsing which will check about the suspicious activities of a site.There "This site is not currently listed as suspicious." is the message for my blog.
So finally I went into Google Webmaster Tools Dashboard and saw the message as shown in the image.When I clicked the "Details" there expanded explanation regarding the issue can be seen.Previously it had shown one URL indicating that there is malware in one url.But how can this happen as the blog is hosted in Blogger.com. So i wanted to contact them. As you can see that there will be a "Request Review" Link.There I gave detailed report regarding the same and finally got out from the problem to some extent.
"Status of the latest badware review for this site: A review for this site has finished. The site was found clean. The badware warnings from web search are being removed. Please note that it can take some time for this change to propagate. Google users will see a warning page when they attempt to visit pages within this site. You can visit the Google Safe Browsing diagnostic page for your site for detailed information about the problems we found.
Please review StopBadware.org's Security Tips for Websitesand make any necessary changes to your site. When you have cleaned your site, you can request a review, and we'll evaluate your site. Request a review"
I have to see how much time will it take for removing this message in the Webmaster Dashboard.
Wednesday, June 10, 2009
Ask Techkran:Post your Problem

Techkran is my experiments with blogging.Now you can ask technical problems that arises to your desktops or laptops and any other internet related problems.We are here to solve your problems and we try to post your queries in this blog as soon as the solution to your problem is arrived..
Mail your problem to techkran@gmail.com
Mail your problem to techkran@gmail.com
Monday, March 23, 2009
Free Calls:Airtel Free Rs100 Talktime from Beepindia

Have you ever heard of free talktime without spending any money?
Here is "Beep" that lets you have free Rs100 /-talktime for Airtel subscribers.But this service is available only for Andhra Pradesh Airtel subscribers as of now.Soon Beepindia will try to extend this service to other states and for other mobile services
How to get free Rs 100 talktime?
You have to just download ad software.
Send a text message ‘Beep’ to 52288 to receives a Wap Push Link.
or get the like from Beep.
How much money?
You will be charged only Rs 2/- for download from your mobile.
Recent post: Get free international calls from Gizmo OpenSky(pe)
Tuesday, March 17, 2009
Get free international calls from Gizmo OpenSky(pe)
Yes it is true that Gizmo provides free international calls now with Opensky[pe].Once the service used to provide 10 minutes per registered user in 2007-2008.Later it was providing just 5 minutes.
Any software?

No need of any software explicitly.You can call by just installing a Gizmocall Plugin of 1 Mb.Apart from that if you are a regular user then you can go for this software.
How to call ?
You can type in the number you want to call preceeded by the country ISD code in the provided box.
The above was a yesteryear's scenario.But now it tied a knot with Skype and got into new name Opensky.
It also offers GizmoCall Firefox Add-on, or install our Firefox Plugin right now which will automatically make any phone number on a web page clickable and place a call via GizmoCall.
Register here to get into calling right now
Saturday, March 14, 2009
Place Adsense Code just below Blog Title
Many of the new bloggers are really eager to know how to place Google Adsense Code right below the Blog Post Title.
But there is a restriction for this as one of the official blogpost of google adsense blog stated that it is not the correct way to place and it violates their TOS unless you refer there as Advertisements or Sponsors.
So follow these simple steps.
1. Here it shows before placing adsense ads.

2.Now you have to create adsense code from "Adsense Setup" of your adsense account.
3.The code that you got finally is Copied[CTRL+C].
4.Now open the Parser.
5.Place your adsense code in the text box provided there.
6.Then click on "Parse" button.

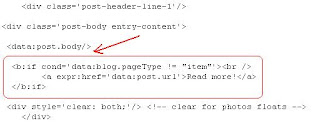
7.Take that Parsed code and search for post-body entry-content and paste just below the div class "post body entry content" as shown below.This will be just above[data:post.body] .

8.Now save your template.
9.The result is you can see the ads just below the post title.

How to Create/Generate Favicon Online
Generating favicons is a good work for the bloggers.They can use the favicon for their blogs that presents them a unique identity in the blogosphere.
What are possible formats?
There are a lot of favicon generators online.Favicon.cc is the best one.Here you can even make animated favicons
Here is another one where you can also create icons by uploading the images which will be automatically converted to the required size
You can generate your own favicons using Photo shop also.See to that those icons should be of 16 x 16 size
Where to host your icons?
There area lot of sites that you can upload your favicons.Google sites,Google pages.Here is some list.
Other best way is to host in Blogger itself !!
What are possible formats?
.ico
.jpg
.bmp
.png
Then how to generate favicon?.jpg
.bmp
.png
There are a lot of favicon generators online.Favicon.cc is the best one.Here you can even make animated favicons
Here is another one where you can also create icons by uploading the images which will be automatically converted to the required size
You can generate your own favicons using Photo shop also.See to that those icons should be of 16 x 16 size
Where to host your icons?
There area lot of sites that you can upload your favicons.Google sites,Google pages.Here is some list.
Other best way is to host in Blogger itself !!
Thursday, March 12, 2009
How to add favicon in Blogger.com

Adding a favicon to your blog will give a nice look to your blog.So i too made a favicon for Techkran Blog and here i'm giving simple tutorial of adding a favicon to a Blogger.com Blog.First of all create your own favicon.After creating favicon,host the favicon in There are a lot of sites for hosting your images.
How to add a favicon?
This is the HTML you have to add.Replace the "/favicon.ico" by your link.
How to add a favicon?
This is the HTML you have to add.Replace the "/favicon.ico" by your link.
Where should you add the code?
The code should be placed in the head section of the template.Here i placed just below [/b:skin ]and above [/head]
What is the code part you have to add.?
Instead of the given link for the favicon ,replace the link with the one you have created.So after adding the code part the template should look like this.

Once after placing the code,just "Save template".Add the you will be able to see your favorite favicon to your blog
How to add "Read More/Continue Reading" in Blogger
This is a real good trick that helps Blogger.com users a big plus point.Using this trick,you can give your blog a website look by keeping "Read More" or "Continue Reading" or anything else in the home page or achieves of your blog.
1.First of all go to your "Dashboard".
2.Choose the "Layout" of the blog for which you are going to keep "Read More".
3.Then go to "Edit HTML" tab.
4.Here we are going to just two codes.
a.One is for style sheet.
b.Other for actual code.
5.So first of all we have to code for our style sheet.Since we dont have a separate style sheet/CSS or code in our custom templates, we have to create that part.This is shown below.

6. Then add this code between

7.It it has to look like this

8.Then the actual code

9.As shown here
That's all now we have to add some code for each post like this

To reduce this risk of adding the same for each post,you can add here

Finally it looks like this on home page

Monday, March 2, 2009
Google Account disabled What to do?

Well you are the one who got your Google account getting disabled.So you know the pain you feel for getting Google account disabled.
Why was it disabled?
Google had already created their own Terms of Services.Only if the user disobeys their TOS,they will disable the Google account.Also Spamming is another activity which lets you get into trouble.
What is disabled?
Some times entire Google account will be disabled.Else you will be restricted to use only some of the Google Services.In most of the cases the users will be loosing their Adsense or Orkut servies because of spamming/violation of TOS.
What should you do now?
There are a lot of other alternatives.
One thing is to honestly and confidently Contact Google team requesting for Re-activation of your account.You know some times some of the Google Accounts by mistake will be kept under scanner.So just try that.
Sunday, March 1, 2009
How to upload new Blogger templates
Many a time new bloggers wonders by seeing at the new blogger templates uploaded/used by some of the existing bloggers.
Here is a simple tutorial on how to upload a new blogger template.
1.Login to your Blogger account.
2.In the "Dashboard",choose the "Layout" of the blog for which you are going to change the Blogger Template.
3.Here you can upload in two ways.
a.One is to upload your own Blogger templates.
b.The other method is to upload existing custom blogger templates that are present at "PickNewTemplates" tab.
4.For 3(a),Go to "Edit HTML"

First of all please Download Full Template.This is to back up your present template.If the new template that you are going to upload makes/gets into some errors or if you make more complex errors in that,then you will loose everthing.So make sure that you back up your template.
After downloading your present template,you can "Browse" your new template and the "Upload" it.

And finally save it.If everthing goes right and no corrections are needed means,you had successfully uploaded the new template.
But sometimes some sort of errors will be seen like "bx356xx" ....
5.For 3(b),this is the simplest way of uploading new and custom templates.

How to capture screenshot videos using Capture Fox Addon
Many a time people will be in need of softwares for making video tutorials,e-lessons etc,by capturing your screen and record your voice to make screencasts .
Here is a simple solution for the same.
How to make video?
2.After installing the Add-on,restart the Firefox browser.
3.You can see the Capture Fox Add-on icon down the browser window[right down corner].
4.For making the screeshot videos,click the Capture Fox Add-on icon.
5.As shown in the below screenshot,select the appropriate options for the settings like
a.Capture area.[Whole Screen,Just Firefox Window]
b.Video Quality.[Low,Moderate,High]
c.Sound[To record your voice withe the video]

6.After choosing the options,the recording of the video starts.
7.U can let the recording till you wants and if you want to stop the recording,just click the Capture Fox Add-on icon down the browser window[right down corner with red minus sign] again.
8.This will show a menu to choose appropriate options for saving or retaking of the another screenshot video.

That's it.You can make wonderful videos.Try it.
Here is a sample video made using the Capture Fox add-on
Tuesday, February 24, 2009
How to Remove or Hide Navbar from blogger-Tutorial

We usually use navbar to search something and also it do has "Next"botton.
It is also used to "Flag" blogs.
But if you want to give yor blog a website look,you really thinks of removing the navbar that is present right at the top of the blogger header.
The process is simple.

1.First Go to Layout.
2.The choose Edit HTML.and go to the position marked in the picture.
 3.Then the following code should be added above the #header-wrapper as shown in the picture
#navbar {
 height: 0px;
 visibility: hidden;
 display: none;
}
After placing the code,click on the "Save Template" to save the changes.
That's it !! Now there is no navbar .It's gone.
This tutorial is for just hiding the navbar and it not against of Blogger Terms of service.

Subscribe to:
Posts (Atom)
Get Email Updates

