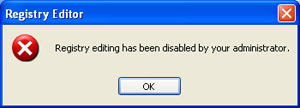
In the last post,we saw how to enable the regedit error "Registry editing has been disabled by your administrator".
Now we'll see how to enable task manager when you ar getting " Task Manager Has been disabled by your administrator".
Method 1:
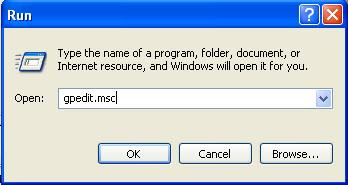
1.Go to Run(CTRL + R) and type " gpedit.msc " as shown in the figure.
2. Now you have to go to this path

Now
Double-click Prevent access to registry editing tools and Set it as Not Configured.
Important: If it's already set to Not Configured, set it to Enabled and click Apply. Then repeat the steps and revert the setting back to Not Configured. This removes the registry based policy
if set already
.
Method 2:
Click Start, then click Run, type in regedit, and click on OK.
Expand these registry keys in turn:
HKEY_CURRENT_USER->Software->Microsoft->Windows->CurrentVersion->Policies-SystemThere,

Now delete the key that is shown in the figure.That the end and you should be able to see the Task Manager right infront.
How to remove "Registry editing has been disabled by your administrator" Error
It is a big hell when one encounters "Registry editing has been disabled by your administrator"
 Infact I was also one of the you who encountered this same problem.
So here is the solution for the problem.
Method 1:
1.Go to Run(CTRL + R) and type " gpedit.msc " as shown in the figure.
2. Now you have to go to this path

Now
Double-click Prevent access to registry editing tools and Set it as Not Configured.
Important: If it's already set to Not Configured, set it to Enabled and click Apply. Then repeat the steps and revert the setting back to Not Configured. This removes the registry based policy if set already.
Method 2:
This is a very simple trick.
1.Go to Run(CTRL + R) and type
"REG add HKCU\Software\Microsoft\Windows\CurrentVersion\Policies\System /v DisableRegistryTools /t REG_DWORD /d 0 /f".
This will eventually enables the Registry editor.Try this.
Wednesday, February 11, 2009
Enable Disabled Registry values by Editing Registry values
Launch Regedit and go to the following Registry Key:
Under this key, there will definitely be a key named explorer. Now under this explorer key we can create new DWORD values and modify it's value to 1 in order to impose the restriction. If you want to remove the Restriction, then you can simply delete the respective DWORD values or instead change their values to 0. The following is a list of DWORD values that can be created under the Explorer Key:
NoDeletePrinter: Disables Deletion of already installed Printers
NoAddPrinter: Disables Addition of new Printers
NoRun : Disables or hides the Run Command
NoSetFolders: Removes Folders from the Settings option on Start Menu (Control Panel, Printers, Taskbar)
NoSetTaskbar: Removes Taskbar system folder from the Settings option on Start
Menu
NoFind: Removes the Find Tool (Start >Find)
NoDrives: Hides and does not display any Drives in My Computer
NoNetHood: Hides or removes the Network Neighborhood icon from the desktop
NoDesktop: Hides all items including, file, folders and system folders from the Desktop
NoClose: Disables Shutdown and prevents the user from normally shutting down Windows.
NoSaveSettings: Means to say, 'Don't save settings on exit'
DisableRegistryTools: Disable Registry Editing Tools (If you disable this option, the Windows Registry Editor(regedit.exe) too will not work.)
NoRecentDocsHistory: Removes Recent Document system folder from the Start Menu (IE 4 and above)
ClearRecentDocsOnExit: Clears the Recent Documents system folder on Exit.
Nolnternetlcon: Removes the Internet (system folder) icon from the Desktop
Now create a new key and name it System. Under this new key, system we can create the following new DWORD values
NODispCPL: Hides Control Panel
NoDispBackgroundPage: Hides Background page.
NoDispScrsavPage: Hides Screen Saver Page
NoDispAppearancePage: Hides Appearance Page
NoDispSettingsPage: Hides Settings Page
NoSecCPL: Disables Password Control Panel
NoPwdPage: Hides Password Change Page
NoAdminPaqe: Hides Remote Administration Page
NoProfilePage: Hides User Profiles Page
NoDevMgrPage: Hides Device Manager Page
NoConfigPage: Hides Hardware Profiles Page
NoFileSysPage: Hides File System Button
NoVirtMemPage: Hides Virtual Memory Button
Similarly, if we create a new subkey named Network, we can add the following DWORD values under it:
NoNetSetupSecurityPage: Hides Network Security Page
NoNelSetup: Hides or disables the Network option in the Control Panel
NoNetSetupIDPage: Hides the Identification Page
NoNetSetupSecurityPage: Hides the Access Control Page
NoFileSharingControl: Disables File Sharing Controls
NoPrintSharing: Disables Print Sharing Controls
HKEY_CURRENT_USER/Software/Microsoft/CurrentVersion/Policies
Under this key, there will definitely be a key named explorer. Now under this explorer key we can create new DWORD values and modify it's value to 1 in order to impose the restriction. If you want to remove the Restriction, then you can simply delete the respective DWORD values or instead change their values to 0. The following is a list of DWORD values that can be created under the Explorer Key:
NoDeletePrinter: Disables Deletion of already installed Printers
NoAddPrinter: Disables Addition of new Printers
NoRun : Disables or hides the Run Command
NoSetFolders: Removes Folders from the Settings option on Start Menu (Control Panel, Printers, Taskbar)
NoSetTaskbar: Removes Taskbar system folder from the Settings option on Start
Menu
NoFind: Removes the Find Tool (Start >Find)
NoDrives: Hides and does not display any Drives in My Computer
NoNetHood: Hides or removes the Network Neighborhood icon from the desktop
NoDesktop: Hides all items including, file, folders and system folders from the Desktop
NoClose: Disables Shutdown and prevents the user from normally shutting down Windows.
NoSaveSettings: Means to say, 'Don't save settings on exit'
DisableRegistryTools: Disable Registry Editing Tools (If you disable this option, the Windows Registry Editor(regedit.exe) too will not work.)
NoRecentDocsHistory: Removes Recent Document system folder from the Start Menu (IE 4 and above)
ClearRecentDocsOnExit: Clears the Recent Documents system folder on Exit.
Nolnternetlcon: Removes the Internet (system folder) icon from the Desktop
Now create a new key and name it System. Under this new key, system we can create the following new DWORD values
NODispCPL: Hides Control Panel
NoDispBackgroundPage: Hides Background page.
NoDispScrsavPage: Hides Screen Saver Page
NoDispAppearancePage: Hides Appearance Page
NoDispSettingsPage: Hides Settings Page
NoSecCPL: Disables Password Control Panel
NoPwdPage: Hides Password Change Page
NoAdminPaqe: Hides Remote Administration Page
NoProfilePage: Hides User Profiles Page
NoDevMgrPage: Hides Device Manager Page
NoConfigPage: Hides Hardware Profiles Page
NoFileSysPage: Hides File System Button
NoVirtMemPage: Hides Virtual Memory Button
Similarly, if we create a new subkey named Network, we can add the following DWORD values under it:
NoNetSetupSecurityPage: Hides Network Security Page
NoNelSetup: Hides or disables the Network option in the Control Panel
NoNetSetupIDPage: Hides the Identification Page
NoNetSetupSecurityPage: Hides the Access Control Page
NoFileSharingControl: Disables File Sharing Controls
NoPrintSharing: Disables Print Sharing Controls
Subscribe to:
Posts (Atom)


