


This is a real good trick that helps Blogger.com users a big plus point.Using this trick,you can give your blog a website look by keeping "Read More" or "Continue Reading" or anything else in the home page or achieves of your blog.
1.First of all go to your "Dashboard".
2.Choose the "Layout" of the blog for which you are going to keep "Read More".
3.Then go to "Edit HTML" tab.
4.Here we are going to just two codes.
a.One is for style sheet.
b.Other for actual code.
5.So first of all we have to code for our style sheet.Since we dont have a separate style sheet/CSS or code in our custom templates, we have to create that part.This is shown below.

6. Then add this code between

7.It it has to look like this

8.Then the actual code

9.As shown here
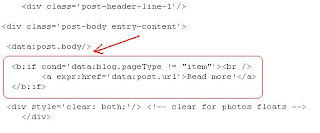
That's all now we have to add some code for each post like this

To reduce this risk of adding the same for each post,you can add here

Finally it looks like this on home page


Monday, March 9, 2009
Remove VBS/Autorun-QO LOVERAHULSAS.vbs
Name: VBS / Autorun-QO (or) LOVERAHULSAS.vbs
Style: virus / spyware
Type: Worm
Propagation method:
(1) move the storage media
(2) Network sharing
Affected operating systems: Windows
VBS/Autorun-QO displays the text "THIS IS AN ANTI-VIRUS AND WILL HELP YOUR SYSTEM TO WORK PROPERLY" and "RAHUL THE H@CkEr".
VBS/Autorun-QO copies itself to accessible drives and the Windows system folder as LOVERAHULSAS.vbs.
VBS/Autorun-QO spreads together with a file autorun.inf. The autorun.inf file is also detected as VBS/Autorun-QO.
The following registry will be created/affected.
HKCU \ Software \ Microsoft \ Internet Explorer \ Main
Window Title
"RAHUL THE H @ CkeR"
HKCU \ Software \ Microsoft \ Windows \ CurrentVersion \ Policies \ Explorer
NoFolderOptions
0
HKCU \ Software \ Microsoft \ Windows \ CurrentVersion \ Policies \ System
DisableTaskmgr 0
HKCU \ Software \ Microsoft \ Windows \ CurrentVersion \ Policies \ System
DisableRegistryTools 0
HKLM \ Software \ Microsoft \ Windows NT \ CurrentVersion \ Winlogon
Shell explorer.exe
HKLM \ Software \ Microsoft \ Windows NT \ CurrentVersion \ Winlogon
Userinit
Internet Explorer start page is adverse to get change and its corresponding registry is modified as selected by the malicious code author.
HKCU \ Software \ Microsoft \ Internet Explorer \ Main Start Page
My tip/advise:
First of all you have to remove all the autorun.inf files from all the drives of your system.Also after doing so,open the registry and change the values that were affected by the virus to its default values.Some of the default values can be checked here.Then restart your system.
Success/Failure put your valuable comments here....
Saturday, March 7, 2009
Know Google Chrome Keyboard Shortcuts
about: ->show version info

about:stats -> shh! this page is secret!

about:version -> same to about:
about:cache -> show cache content
about:plugins -> show info of plugins installed
Like :
ActiveX Plug-in
File name: activex-shimActiveX Plug-in provides a shim to support ActiveX controlsabout:crash -> crash the tab
about:dns -> show dns info, like time
about:network -> network tools

about:internets -> the tubes are clogged!
about:histograms ->histograms resume

CTRL,SHIFT,KEY Combinations:
Ctrl+T-> To Open a new tab
Ctrl+N-> To Open a new Chrome window
Ctrl+Shift+N ->To Open a new window in incognito mode
Ctrl+O -> To Open a selected file from your computer in Google Chrome
Ctrl + a link -> To Open link in a new background tab while remaining on the current tab
Ctrl+Shift + a link -> To Open link in a new tab and switch to the newly opened tab
Shift + a link -> Open link in a new window
Alt+F4 is always to close current window
Ctrl+Shift+T Reopen the last tab you've closed. Google Chrome remembers the last 10 tabs you've closed.
Ctrl+1 through Ctrl+8 Switch to the tab at the specified position number. The number you press represents the position of the tab on the tab strip.
Ctrl+9 Switch to the last tab
Ctrl+Tab or Ctrl+PgDown Switch to the next tab
Ctrl+Shift+Tab/Ctrl+PgUp Switch to the previous tab
Ctrl+W or Ctrl+F4 Close current tab or pop-up
Alt+Home Open your homepage
Most of the Google Chrome Browser Keyboard Shortcuts are similar to that of Firefox Mozilla
Sunday, March 1, 2009
How to upload new Blogger templates
Many a time new bloggers wonders by seeing at the new blogger templates uploaded/used by some of the existing bloggers.
Here is a simple tutorial on how to upload a new blogger template.
1.Login to your Blogger account.
2.In the "Dashboard",choose the "Layout" of the blog for which you are going to change the Blogger Template.
3.Here you can upload in two ways.
a.One is to upload your own Blogger templates.
b.The other method is to upload existing custom blogger templates that are present at "PickNewTemplates" tab.
4.For 3(a),Go to "Edit HTML"

First of all please Download Full Template.This is to back up your present template.If the new template that you are going to upload makes/gets into some errors or if you make more complex errors in that,then you will loose everthing.So make sure that you back up your template.
After downloading your present template,you can "Browse" your new template and the "Upload" it.

And finally save it.If everthing goes right and no corrections are needed means,you had successfully uploaded the new template.
But sometimes some sort of errors will be seen like "bx356xx" ....
5.For 3(b),this is the simplest way of uploading new and custom templates.

Tuesday, February 24, 2009
How to Remove or Hide Navbar from blogger-Tutorial

We usually use navbar to search something and also it do has "Next"botton.
It is also used to "Flag" blogs.
But if you want to give yor blog a website look,you really thinks of removing the navbar that is present right at the top of the blogger header.
The process is simple.

1.First Go to Layout.
2.The choose Edit HTML.and go to the position marked in the picture.
 3.Then the following code should be added above the #header-wrapper as shown in the picture
#navbar {
height: 0px;
visibility: hidden;
display: none;
} After placing the code,click on the "Save Template" to save the changes.
That's it !! Now there is no navbar .It's gone.
This tutorial is for just hiding the navbar and it not against of Blogger Terms of service.

Monday, February 16, 2009
Enable "Task Manager Has been disabled by your administrator"
In the last post,we saw how to enable the regedit error "Registry editing has been disabled by your administrator".
Now we'll see how to enable task manager when you ar getting " Task Manager Has been disabled by your administrator".
Method 1:
1.Go to Run(CTRL + R) and type " gpedit.msc " as shown in the figure.

2. Now you have to go to this path

Now
Double-click Prevent access to registry editing tools and Set it as Not Configured.
Important: If it's already set to Not Configured, set it to Enabled and click Apply. Then repeat the steps and revert the setting back to Not Configured. This removes the registry based policy
if set already
.

Method 2:
Click Start, then click Run, type in regedit, and click on OK.
Expand these registry keys in turn:
HKEY_CURRENT_USER->Software->Microsoft->Windows->CurrentVersion->Policies-SystemThere,


Now delete the key that is shown in the figure.That the end and you should be able to see the Task Manager right infront.
How to remove "Registry editing has been disabled by your administrator" Error
It is a big hell when one encounters "Registry editing has been disabled by your administrator"
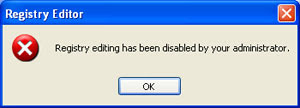 Infact I was also one of the you who encountered this same problem.
So here is the solution for the problem.
Method 1:
1.Go to Run(CTRL + R) and type " gpedit.msc " as shown in the figure.
2. Now you have to go to this path

Now
Double-click Prevent access to registry editing tools and Set it as Not Configured.
Important: If it's already set to Not Configured, set it to Enabled and click Apply. Then repeat the steps and revert the setting back to Not Configured. This removes the registry based policy if set already.
Method 2:
This is a very simple trick.
1.Go to Run(CTRL + R) and type
"REG add HKCU\Software\Microsoft\Windows\CurrentVersion\Policies\System /v DisableRegistryTools /t REG_DWORD /d 0 /f".
This will eventually enables the Registry editor.Try this.
Wednesday, February 11, 2009
Enable Disabled Registry values by Editing Registry values
Launch Regedit and go to the following Registry Key:
Under this key, there will definitely be a key named explorer. Now under this explorer key we can create new DWORD values and modify it's value to 1 in order to impose the restriction. If you want to remove the Restriction, then you can simply delete the respective DWORD values or instead change their values to 0. The following is a list of DWORD values that can be created under the Explorer Key:
NoDeletePrinter: Disables Deletion of already installed Printers
NoAddPrinter: Disables Addition of new Printers
NoRun : Disables or hides the Run Command
NoSetFolders: Removes Folders from the Settings option on Start Menu (Control Panel, Printers, Taskbar)
NoSetTaskbar: Removes Taskbar system folder from the Settings option on Start
Menu
NoFind: Removes the Find Tool (Start >Find)
NoDrives: Hides and does not display any Drives in My Computer
NoNetHood: Hides or removes the Network Neighborhood icon from the desktop
NoDesktop: Hides all items including, file, folders and system folders from the Desktop
NoClose: Disables Shutdown and prevents the user from normally shutting down Windows.
NoSaveSettings: Means to say, 'Don't save settings on exit'
DisableRegistryTools: Disable Registry Editing Tools (If you disable this option, the Windows Registry Editor(regedit.exe) too will not work.)
NoRecentDocsHistory: Removes Recent Document system folder from the Start Menu (IE 4 and above)
ClearRecentDocsOnExit: Clears the Recent Documents system folder on Exit.
Nolnternetlcon: Removes the Internet (system folder) icon from the Desktop
Now create a new key and name it System. Under this new key, system we can create the following new DWORD values
NODispCPL: Hides Control Panel
NoDispBackgroundPage: Hides Background page.
NoDispScrsavPage: Hides Screen Saver Page
NoDispAppearancePage: Hides Appearance Page
NoDispSettingsPage: Hides Settings Page
NoSecCPL: Disables Password Control Panel
NoPwdPage: Hides Password Change Page
NoAdminPaqe: Hides Remote Administration Page
NoProfilePage: Hides User Profiles Page
NoDevMgrPage: Hides Device Manager Page
NoConfigPage: Hides Hardware Profiles Page
NoFileSysPage: Hides File System Button
NoVirtMemPage: Hides Virtual Memory Button
Similarly, if we create a new subkey named Network, we can add the following DWORD values under it:
NoNetSetupSecurityPage: Hides Network Security Page
NoNelSetup: Hides or disables the Network option in the Control Panel
NoNetSetupIDPage: Hides the Identification Page
NoNetSetupSecurityPage: Hides the Access Control Page
NoFileSharingControl: Disables File Sharing Controls
NoPrintSharing: Disables Print Sharing Controls
HKEY_CURRENT_USER/Software/Microsoft/CurrentVersion/Policies
Under this key, there will definitely be a key named explorer. Now under this explorer key we can create new DWORD values and modify it's value to 1 in order to impose the restriction. If you want to remove the Restriction, then you can simply delete the respective DWORD values or instead change their values to 0. The following is a list of DWORD values that can be created under the Explorer Key:
NoDeletePrinter: Disables Deletion of already installed Printers
NoAddPrinter: Disables Addition of new Printers
NoRun : Disables or hides the Run Command
NoSetFolders: Removes Folders from the Settings option on Start Menu (Control Panel, Printers, Taskbar)
NoSetTaskbar: Removes Taskbar system folder from the Settings option on Start
Menu
NoFind: Removes the Find Tool (Start >Find)
NoDrives: Hides and does not display any Drives in My Computer
NoNetHood: Hides or removes the Network Neighborhood icon from the desktop
NoDesktop: Hides all items including, file, folders and system folders from the Desktop
NoClose: Disables Shutdown and prevents the user from normally shutting down Windows.
NoSaveSettings: Means to say, 'Don't save settings on exit'
DisableRegistryTools: Disable Registry Editing Tools (If you disable this option, the Windows Registry Editor(regedit.exe) too will not work.)
NoRecentDocsHistory: Removes Recent Document system folder from the Start Menu (IE 4 and above)
ClearRecentDocsOnExit: Clears the Recent Documents system folder on Exit.
Nolnternetlcon: Removes the Internet (system folder) icon from the Desktop
Now create a new key and name it System. Under this new key, system we can create the following new DWORD values
NODispCPL: Hides Control Panel
NoDispBackgroundPage: Hides Background page.
NoDispScrsavPage: Hides Screen Saver Page
NoDispAppearancePage: Hides Appearance Page
NoDispSettingsPage: Hides Settings Page
NoSecCPL: Disables Password Control Panel
NoPwdPage: Hides Password Change Page
NoAdminPaqe: Hides Remote Administration Page
NoProfilePage: Hides User Profiles Page
NoDevMgrPage: Hides Device Manager Page
NoConfigPage: Hides Hardware Profiles Page
NoFileSysPage: Hides File System Button
NoVirtMemPage: Hides Virtual Memory Button
Similarly, if we create a new subkey named Network, we can add the following DWORD values under it:
NoNetSetupSecurityPage: Hides Network Security Page
NoNelSetup: Hides or disables the Network option in the Control Panel
NoNetSetupIDPage: Hides the Identification Page
NoNetSetupSecurityPage: Hides the Access Control Page
NoFileSharingControl: Disables File Sharing Controls
NoPrintSharing: Disables Print Sharing Controls
Save Mozilla Firefox History-Back up it from places.sqlite in Windows XP/2000
Today I needed to save my Firefox history as I have to format my Operating System.
So struggled to save history as it contains a lot of stuff.
Everyone thinks of saving the history.So i got a solution to do so.
Here is the screen shot.

Steps to follow:
1.Go to C:\
2.Then the Documents and Settings
3.Then Admin named folder[Here Techkran]
4.Then ApplicationData
5.Finally Mozilla\Firefox\Profiles\
6.Here some folder like bh1ey9q6.default
On the whole,it looks something like this
C:\Documents and Settings\techkran\ApplicationData\Mozilla\Firefox\Profiles\bh1eq6.default
Subscribe to:
Posts (Atom)
Get Email Updates


